Tuesday, 9 February 2016

Rimmel Match Perfection Foundation (new formula) & Fix & Protect Primer Review


Happy Tuesday everyone!
 
I hope you are having a great start to the week.
 
Today I am reviewing the new formulation of Rimmel's Match Perfection foundation and Fix & Protect makeup primer.
 
Scroll down for a review, swatches and before and afters.


Rimmel Fix & Protect Makeup Primer

30ml $13.95

This primer acts as a protective barrier for your skin. It helps shelter skin from pollution, is anti-stress, and is also skin perfecting.
I didn't notice a difference in longevity of foundation wear or any minimizing of pores but it does make my skin feel really soft and hydrated and foundation go on smoothly.
It feels really light weight and non greasy and blends into my skin easily. It has an SPF of 25 so you can wear it under foundation or just as a sunscreen.
The consistency is thin and runny and has the standard Rimmel foundation fragrance.


Rimmel Match Perfection Foundation

30ml $18.95

This is the reformulated version on the first Match Perfection foundation which I haven't tried before, but I have really been enjoying this new version.
I love the satin finish of the foundation, it isn't too matte or dewy and feels really silky and light on my skin but still has a good medium, buildable coverage which looks really natural.
It has a 24 hour moisture complex which helps keep my dry skin hydrated and doesn't cling to any dry patches and also has SPF 20 which makes it a great day time foundation.
They say it has soft focus powders which help reduce the appearance of imperfections, pores and dark circles.
The packaging is nice and has a pump which is always helpful.
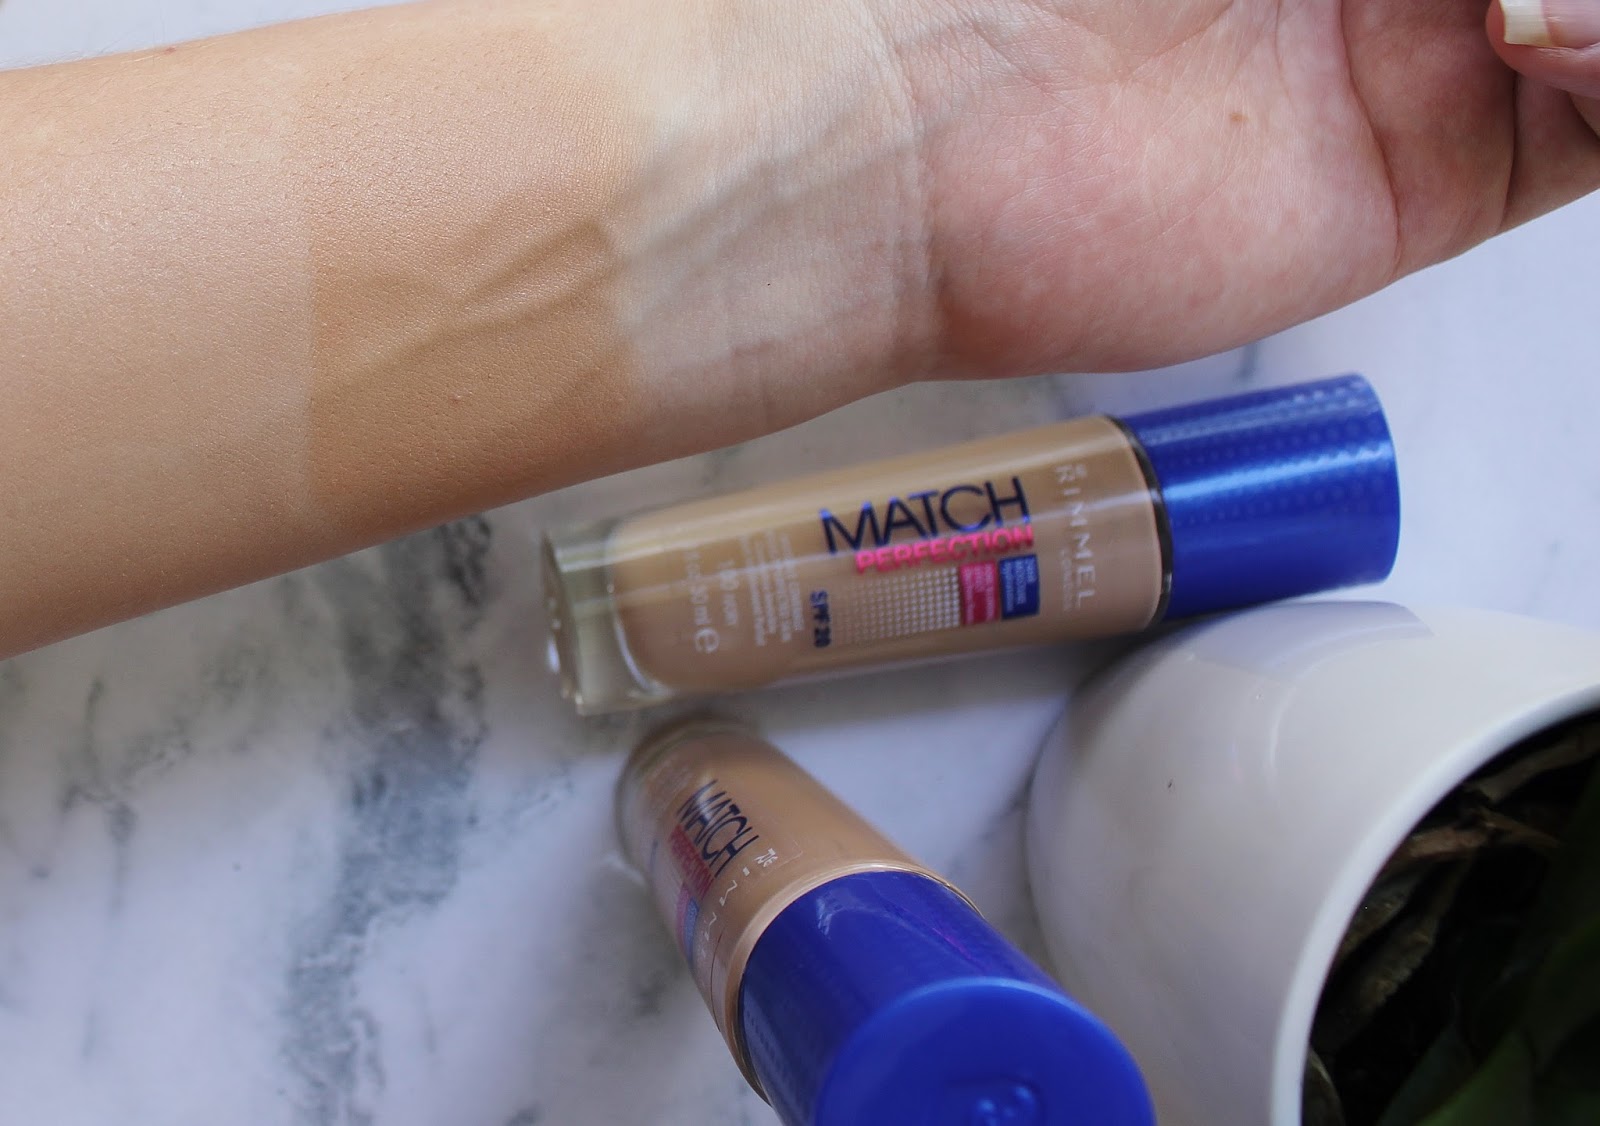
It is a medium consistency and really easy to blend, I use my Models Prefer foundation brush and two pumps of foundation. I mix two shades together at the moment to get the right colour, 100 Ivory and 200 Soft Beige (both of these colours have yellow undertones.) There are 8 colours to choose from in Australia.
It is quite fragranced like Rimmel's other foundations, which I don't mind as it doesn't irritate my skin.
Lastly, I find depending on how humid it is I generally get 6-8 hours wear out of it before it starts to fade in certain places.
Overall I would defiantly recommend the Match Perfection as a great everyday wear foundation.


Left- Ivory Right- Soft Beige

Blended in.


Before & After


Here are some before & afters of my skin using the primer and foundation. Don't mind my skin, I've been having some breakouts lately :(. The foundation does a good job of covering a lot of the redness.


Before

With primer.

After foundation.

Finished makeup.


A close up of my skin.


I hope you guys enjoyed this post, thanks for reading! Let me know in the comments if you have tried the Match Perfection foundation before or what your favourite foundation is at the moment.
 
To keep up with my posts feel free to follow me on Bloglovin' and Insagram.
 
Have a great week :)
 
Mary
XO


Disclaimer- These products where sent to me for consideration, but all opinions are my own.


Tuesday, 2 February 2016

Younique Moonstruck Mineral Pigment & Eyeliner Review


Hi guys!
 
This week I'm writing a review on two products from the brand Younique. I purchased these a few months ago through my lovely friend Amanda who is a rep for Younique. I thought I'd write up a blog post with my thoughts on the products with some swatches.


Moonstruck Mineral Pigment 

$16 for 12g of product.
 
The packaging of the pigments is really nice and simple, it includes a sieve so you don't get too much product out at a time which is helpful.
I really like pigments to use all over the lid for an easy eye look and this pigment works great to pat on your eyelid and blend into the crease with a light brown matte eyeshadow colour. 
Their are 34 colours to choose from in the pigments, the colour I chose is called 'Confidant', which is a shimmery, bronze colour with gold reflects. 
You can apply these pigments either wet or dry but I find they are easier to apply dry and gently pat over the eyelid using a flat shader brush or your finger so you minimize fallout. 


Here I am wearing the pigment all over my lids and as you can see it shows up differently when in different lighting.

Moonstruck Precision Pencil 

$20 for 1.2g of product.

Their are 10 eyeliner colours to choose from, the colour I bought was 'Perfect'. They say the eyeliners are waterproof and smudge proof which I would agree with as it stays on my waterline for most of the day. The pencil applies smoothly and is creamy and opaque. The casing of the pencil is plastic but can be sharpened just like a wooden one.

The only thing was that when I was looking at the swatches for the pencils and on the back of the actual packaging it looked brown but then when I got it, it was black which I'm not sure if it was packaged wrong or something but it didn't really bother me as I can always use black eyeliner. Younique do have a 'love it guarantee' but in this instance I was happy to keep it.


Well, that's it for now :) I hope you found this post helpful and if you want to see the Younique products for yourself Amanda has a Facebook page where you can check them out and ask her any questions you might have.

Oh and also, I will be doing a bonus post this week with some makeup look ideas for Valentines Day which is coming up in a couple of weeks! If you don't want to miss it you can follow me on Instagram,  Bloglovin', or Google+ :)

I hope you all have a lovely week!

Mary
XO


Disclaimer~ This post is in no way sponsored and I purchased the products myself.

Tuesday, 26 January 2016

Rimmel London Sun Shimmer Instant Tan & Self Tan Mousse Review


Hi guys,
 
Happy Australia Day! I hope you all had a lovely day celebrating.
 
Over the last couple of weeks I have been trying out the recently released Sun Shimmer self tanners from Rimmel London and I am really impressed with how they performed!
Scroll down for a review, and before and after photos!


Rimmel Sun Shimmer Wash Off Instant Tan  


I decided to try out the Sun Shimmer Instant Tan first. There are two shades available, I used medium.
It's always a good idea to exfoliate before applying any sort of fake tan so I used Anatomicals Melon body scrub which works great.

The Rimmel Sun Shimmer instant tan 9 in 1 BB skin perfector acts as a BB cream for your face so it does multiple jobs.
It claims to soften, smooth, moisturise, give an instant tan, create a healthy looking glow, even out skin tone, cover, perfect and last up to 24 hours.

I just decided to apply this with my hands because I needed to go buy a new tanning mitt. It washed of my hands easily with soap, but I would suggest using a mitt just to be safe!
The consistency is really nice, it just felt like putting on a moisturiser. It was really quick to apply as it blended in really easily. It has a nice fragrance with no funny fake tan smell.
As you can see in the photos below, it gave a really natural, even looking tan. My legs felt really soft and silky afterwards and the tan dried in a couple of minutes and didn't transfer onto my clothes even in the hot and humid Queensland weather!

I wore it all day and went swimming with it on in the evening. I thought it might run everywhere and be really messy, but it just came off mostly in the water without going patchy or running and left my skin feeling super smooth afterwards.
This product is ideal as a starting point for someone wanting to try fake tanning
 as it's so easy to apply, washes off easily and gives a nice bronzy glow.


Left- Before
Right- After applying Sun Shimmer Instant Tan


Rimmel Sun Shimmer Self Tan Mousse


There are three shades available in the mousse. Light, medium and dark all are matte colours. I used medium and it gave a perfect natural looking tan. 
Like Rimmel's instant tan, it has no bad fake tan smell and is fragranced. It is also green based so it won't make you go orange ( so you won't look like Ross from Friends, if you're a fan you'll know which episode I mean. ) 
Anyway... to prep my skin I used an exfoliator and also moisturised, make sure you pay special attention to your ankles, knees, wrists, elbows, hands and feet where you tend to get extra dry skin, as fake tan tends to go quite patchy if you haven't exfoliated. I do this at least a few hours before tanning as it gives the moisturiser a chance to sink in properly and I always shave the day before so I don't irritate my skin.
When applying the tan I used a Le Tan tanning mitt and a while ago I saw Jaclyn Hill use a really cool trick where she used a foundation brush to buff the tan into to her face and neck, which is an awesome idea and works a treat! I also did this on my neck and hands to make sure they where even and streak free.
I really like the formula and consistency of the mousse, it's really lightweight and easy to apply. Because it  has a instant colour you don't go over where you have already been and it dries within a couple of minutes and doesn't feel sticky and once it dried it didn't transfer onto my clothes at all. The tan develops in one hour so it's great if you have an event or something last minute that you want to look nice and bronzed for. I left mine on over night just to see if it would crease or transfer onto my sheets and it didn't which is awesome, it also did get a bit darker over night as well. My skin generally gets pretty dry, especially if I have fake tan on but the formula of the mousse is oil enriched so it made my skin feel nice and soft and I only felt like I needed to moisturise a few days out of the week.
When you wash it off in the shower the excess tan comes off and leaves a really nice natural colour that didn't go patchy and lasted 5 days before starting to fade slowly. There is photo below of what the tan looked like after the week was up, it lasted really well and this is now a new favourite!


What I use to prep my skin and apply the tan.
Models Prefer Airbrush foundation brush, Anatomicals melon body scrub and Le Tan tanning mitt.


Left- Before tan
Right- After washing off tanning mousse.


Left- Instant tan
Right- Mousse.


After 1 week of applying


That's it for this Tuesday, thanks so much for reading my post! I hope you enjoyed it.
If you haven't already, feel free to check out my last post on one of A'kin's amazing moisturisers.
Or come say hi on Instagram or Bloglovin' :)
Mary
XO


Disclaimer- These products where sent to me for consideration, but all opinions are my own.
 

Tuesday, 12 January 2016

A'kin Rosehip & Shea Intensive Moisture Creme For Dry & Sensitive Skin


A'kin Rosehip & Shea Intensive moisture Antioxidant Crème

 
Hi guys!
 
This week I'm writing a review on the Akin intensive moisturiser for dry and sensitive skin. When I received this in the mail I was really excited to try it as I have only tried one other thing from A'kin, their rosehip oil which was in my skincare empties post if you want to check out my review on that you can by clicking here.


A'kin by Purist is an Australian made and owned company that does not test on animals and is also paraben and sulfate free using loads of active natural ingredients that are amazing for your skin.
 
Even though I have dehydrated/dry skin I hate the feeling of thick creams that just feel like they are sitting on top of my skin, so when I opened up the jar and saw how thick it looked I wasn't sure if I would like it, but, I was very pleasantly surprised. It feels thick but then when you apply it, it just melts into your skin and is really easy to massage in leaving no greasy feeling just really soft and hydrated. It smells like roses and feels really luxurious to apply.
 
A few of the great ingredients in this moisturiser are Shea butter, Rosehip oil, Jojoba, Avocado oil and Aloe barbadensis leaf juice which all help reduce redness and irritation and intensively hydrate your skin which it definitely does all these things.
 
I used it every morning and evening for 8-9 weeks until it was finished and I saw a massive difference in my skin. My breakouts and redness lessened, my skin didn't feel dry anymore and my scars from breaking out and picking at my skin faded a lot and this was the only thing I changed in my skincare routine!

I would definitely recommend this moisturiser for anyone with dry/ dehydrated/ sensitive skin. I will be purchasing some more for myself very soon!
 
The RRP is $39.95 and you can find a list of stockists on The Purist Company website.


I hope you guys enjoyed this post and found it helpful. Let me know if you have tried the Intensive moisture creme from A'kin before or what your favourite moisturiser is in the comments below.
To keep up with me during the week head over to my Instagram and follow on Bloglovin' so you don't miss any of my posts. ;)
 
Thanks for reading, see you next week!
 
Mary XO


Disclaimer- This product was sent to me for consideration but all opinions are my own.


Tuesday, 5 January 2016

Rimmel London Nude Lipstick Collection by Kate


Lasting Finish Nude Lipstick Collection by Kate Moss

 
Welcome,
 
Happy New Year! I hope you all had a lovely time over the Christmas holidays and are enjoying 2016 so far. For me this year, it's time to really get into blogging. I have been busy organizing lots of posts for you guys over the past couple of weeks. I will be posting every Tuesday night now so if you have any requests for upcoming posts please feel free to leave me some suggestions in the comments! Anyway, I hope you enjoy reading this weeks post on these lovely lipsticks...


In Rimmel's latest Nude lipstick collection by Kate Moss there are 5 shades to choose from. They have something to suit most skin tones, from cool to warm complexions and also light to deeper ones. Of course you can just wear which ever colour you want to and that you like the look of though haha.

Rimmel say they last up to 8 hours, although I find it's about 4-5 hours on me, which is still a good amount of time and they are super easy to apply on the go.

The formula is creamy and opaque and smells like vanilla. I personally love the scent, but if you're not too keen on sweet scents you might not like it so much. The light pink and silver packaging is also really nice!
My go to colours for the 'perfect nude lip' out of this collection are 43 & 45.

Keep reading for more details about each colour and some lip swatches.


The packaging is so pretty!


                                         Swatches from left to right. 40, 42, 43, 45 & 48.


No.40.

This first swatch is of the colour no. 40. A cool toned, very pale apricot colour. Number 40 is the lightest of the 5 lipsticks in the collection. This colour is the least flattering on my skin tone, but looks really nice on very light complexions. My sister borrows this colour and it looks lovely with her light/cool toned skin.


No. 42.
This colour is darker than 40 and is a more cool/neutral toned nude. Because it is a neutral tone it would suit most light-medium complexions.


No. 43.

I really like this colour, it suits me the most out of all 5 lipsticks. It is a warm apricot colour and really suits light to medium, yellow under toned skin.


No. 45.

This colour is probably the most popular out of the collection that I have seen. It is a nice medium, neutral nude with mauve undertones (It shows up a bit pinker than what it is in this photo because of the lighting.) This colour is virtually the same as my lips, so it's perfect for those days you just want a bit of lipstick on but not something super obvious.


 No. 48.

Last but not least is number 48 which is a really pretty brown, cool toned nude. A perfect nude for people with darker skin tones which are on the cool side.


Thank you for reading, I hope you enjoyed this post. Feel free to comment and tell me what your favourite nude lipsticks are so I can check them out! Come be friends and keep up with my posts on Bloglovin' & Instagram @glossysituations.

Have a great week guys!

Mary XO


*This product was sent to me for consideration but all opinions are my own.
 

Sunday, 13 December 2015

Skincare Empties & Product Reviews


 Skincare Empties


In this post I will be showing you guys all the skincare products I have used up over the past few months. I will also give a short review of the products and which of them I would or wouldn't purchase again. My skin is normal/dry and prone to breakouts. I hope you find this post useful!


Lush Let The Good Times Roll Facial Cleanser

This is one of my favourites from Lush! It is a gentle exfoliating cleanser with maize, polenta and cinnamon. It also smells amazing, exactly like caramel popcorn!
I used this product 2-3 times a week and it always left my skin super smooth afterwards. It comes as sort of a thick paste so you mix it with a small amount of water in the palm of your hand and then massage it onto your face. I would definitely re-purchase this one!

$16.95 for 100gm 


Lush Dream Cream Hand & Body Lotion

Okay, so I realised I have loved pretty much everything I have tried from Lush and Dream Cream is one I really need to go out and buy a full size of it! 
The Dream Cream smells so nice and relaxing, perfect to slather on before bed time! It is a light weight cream so sinks in nice and fast. It has oat milk, chamomile, lavender, rose water, tea tree oil plus other goodies to help sooth your skin! 

$29.95 for 240gm


Sanctuary Spa Fresh Faced Purifying Wash 

Usually I lean more towards cream cleansers rather than foaming ones because I find that they can strip my skin and leave it feeling dry but I really like this one by Sanctuary Spa because it contains Vitamin E and Glycerin which helps cleanse your skin whithout drying it out! This face wash is part of their Deep Cleanse range and I find it is great to use at the end of the day for a deep cleanse and remove all the grime and makeup. It also has Witch Hazel and Chamomile to help with breakouts. This is another one I would purchase again!

RRP $20 for 140ml available at Priceline


Sanctuary Spa Warming Micro Brasion Polish

I really love the feeling of this polish because as you use it, it warms up on your skin and really feels like it's working into your pores to clean them. The polish has marine earth and kaolin to exfoliate and Jojoba oil and Wheatgerm to help hydrate your skin. The only thing I don't like about this product is that it stings a lot if you have open or healing blemishes, so I like to use it after they have healed to help fade scars which I found works quite well because it gently buffs away the scared layers of skin and helps even out your skin texture a bit. This product last for ages and works really well, so I would probably purchase again but after my skin heals up a bit more.

RRP $20 for 100ml from Priceline


Sanctuary Spa Pore Refining Toner 

Like the face wash, this toner is also part of Sanctuary Spa's Deep Cleanse range. I love how the spray comes out really fine and evenly so it feels nice and refreshing and not just getting squirted in the face like some other brands packaging I have tried. The pore refining toner has Witch Hazel which helps to fight blemishes and balance your skin's PH levels after washing your face. It has a light Rose scent but nothing over powering. As for it being pore refining I didn't notice any change as with the quality of my skin. So, in saying that I did like this toner but I will probably keep looking to find one that helps my skin a bit better.
RRP $20 for 150ml available from Priceline


A'kin Organic Pure Radiance Rosehip Oil

I picked up the A'kin rosehip oil a few months ago to try and really loved how it made my skin feel. I used it every night after cleansing and before moisturising. I tried using it morning and night for about a week but I found it made my skin start to breakout because it is quite a rich oil it's best used as sort of a treatment at night. It made my skin nice and glowy and healthy looking and after using it for a while I saw it slowly start to fade my scars. I find this oil to be stronger smelling and darker in colour than others that I have tried because it is extracted under a low heat as to not destroy any of the goodness in the oil and it also contains lots of beta-carotene which make it a darker colour.
I would definitely purchase again.

RRP $19.95 for 23 ml Available at Priceline


Thursday Plantation Tea Tree Oil

 I love using Tea Tree oil on my skin as a spot treatment for blemishes. I use a small amount on a cotton tip either mixed with a bit of coconut oil or water to dilute it a little bit and dab on any spots.
I like to use this as part of my night time skin care and apply it before my toner and moisturiser and give it a minute to soak I before applying anything else. Tea tree oil is very drying, so if it starts to get too much I use it every other night.
I will definitely continue to re purchase!


You can buy Tea Tree oil from Supermarkets and health food stores and prices start from $4.95 so it's super cheap!


Sukin Facial Moisturiser for Normal Skin

I love this Sukin moisturiser for right before makeup or mixing with foundations to thin them out as it
is very light and soaks in really quickly.
It contains lots of great ingredients like aloe vera, horsetail, nettle, rosehip, jojoba and avocado oil to soften and hydrate your skin plus it smells delicious! I would re purchase this moisturiser as it is a good all rounder.
RRP is $9.99 for 125 ml at Priceline.

Garnier Sensitive 2 in 1 Gentle Makeup Remover

I really like the Garnier Micellar water as a everyday makeup remover but for really stubborn long lasting and waterproof makeup I love having the Garnier Clean Sensitive 2 in 1 makeup remover in my cupboard as it gets pretty much everything off and doesn't irritate my eyes and skin at all.
 RRP $9.99 for 200ml at Priceline.


Thanks so much for reading!
I hope you found this post useful for next time you're shopping for skincare.
Let me know in the comments below what your favourite skincare products are!

Mary XO


Tuesday, 22 September 2015

Rimmel London New 'Brow This Way' Review, How To & Swatches


Hi guys,
 
Welcome back to Glossy Situations!
 
Today I am writing a review on the new collection from Rimmel London 'Brow This Way.'
Keep reading for swatches of the products, how I fill in my brows and a before and after photo.
 
 
Brow This Way- Brow styling kits. Left- Medium brown, Right- Dark brown.
 
BROW SCULPTING KIT
 
I have been trying out these new products for the last couple of weeks and I can say I am really liking them! There are two colours to choose from in the brow kits, Dark Brown and Medium Brown.
 
The consistency and pigmentation of the wax in the kits is great, not too slippery and not too dry. This makes it perfect to go from very naturally filled in brows to bold by building up the product. The kit also includes a double sided angled brush. One end is slightly stiffer (to apply the wax) and the other end is a bit softer to apply the powder. A small spoolie is also included so you can blend the product in better and brush the hairs upwards.


The first two swatches are the dark brown wax and powder, then the medium brown wax and powder.
 
 
BROW STYLING GEL
 
 
There are four different colours to choose from in the brow stying gel's. Dark Brown, Medium Brown, Blonde and clear.
As you can see from the swatches, the dark brown and the blonde are on the ashier side while the medium brown is a bit warmer.
These gels are perfect to wear on their own as they are very pigmented or over the wax and powder to make sure your brows stay in place. Keep in mind they do not have the strongest hold, but I find they still keep my brows neat without them feeling hard or crusty which I like.
Also because the gel's are so pigmented and a lot of product comes out on the brush I like to wipe a little bit off first or start in the middle of my brows to avoid getting to much product on the front of my brows.


L-R Dark brown, Medium brown and Blonde
 
 
HOW- TO / BEFORE & AFTER

 
Here are the steps I use when I fill in my brows with the Brow This Way kit and gel.
 
1. First of all I comb my brows upwards and outwards with the spoolie to get them into the shape that I want.
 
2. Using the angled brush I pick up some of the dark brown wax starting in top middle of my brow carefully drawing outwards toward the tail of my brow creating a soft outline on the top and bottom of my brow then filling in the middle, picking up more product as needed. I use whatever is left on the brush to very softly fill in the front of my brows to keep them looking more natural.
 
3. Next I use a little bit of the powder from the kit to go over the wax and set it in place.
 
 
4. Lastly, I use the dark brown styling gel to go over my brows and set them in place and I'm done!
 
 
Before
 
After


So that brings us to the end of this weeks post, I hope you enjoyed it and you found it useful! :)
Let me know in the comments if you have tried this collection yet or what your favourite brow products are, I would love to know!

Thanks for reading :)

Mary XO